Have you learned how to read crochet patterns yet? I’m assuming the answer is no because you’re here. Learning to read patterns is not as daunting as it looks, I promise. It’s actually very methodical and once you’ve got the basics down you’ll be reading patterns like children’s books.
One of the scariest things about reading crochet patterns is all the symbols and abbreviations. Theoretically speaking, most crochet patterns are the same but the terminology may vary slightly. For example one designer might write ‘single crochet’ as ‘sc’ and another might write it as ‘SC’. The only difference is that one of them is capitalised but if you’re used to lowercase abbreviations seeing an uppercase ‘SC’ will leave you frantically scrolling through your pattern mumbling ‘SC? What the hell is SC?’
Don’t panic my friend! Here are some tips for reading crochet patterns that will get you started. Once you figure out what you’re doing it will open up a whole new world of crochet!
- Crochet patterns are worked in either rows or rounds (rnds). Each pattern will specify whether you are working in rows, rounds or a combination of both. Rows go back and forth and rounds are worked in circles.
- Chill out and calm down. Reading crochet patterns is scary and frustrating at first but the only way you’ll get better at it is if you give it time and practice. There are no shortcuts. Take a deep breath, strap on your positive attitude and give it a red hot go. And if you don’t get it right away (Hint: you most likely won’t!) give it another go tomorrow. And the next day… until you get it.
- You must read the full pattern before you start. The beginning may look very easy but there may be a section further down that you don’t yet have the skills to complete.
- Most crochet patterns are rated according to level of difficulty, including beginner, intermediate and advanced. These are guides only – make sure you read the pattern to see if you have the skills to complete it.
- Make sure you count your stitches every few rows to make sure your stitch count is correct. You should do this more often when you’re a beginner – as your skills increase as a crocheter, you won’t need to do it as often as you’ll naturally be able to recognise whether or not your pattern is doing what it’s supposed to be doing.
- Always check your gauge. While it may not be so important if you are making a project that has no set finished size (like a scarf), you will be setting yourself up for disappointment if you are making a project like a dress or a top. To check your gauge, crochet a swatch approximately 4 inches by 4 inches in the stitch pattern used in the crochet instructions. If your gauge is larger than the gauge indicated in the pattern, try a smaller hook. If your gauge is smaller, try a larger hook.
- Another great way to learn to read crochet patterns is to choose a pattern that has a tutorial. In the Crochet Coach hub all patterns have written instructions and videos to help you out if you get stuck.
- You should also choose a recent pattern and possibly one where you can contact the designer. Older patterns often don’t have great support for makers so try not to a pick a patter
- Choose a paid pattern. There are some fantastic free patterns available but if you’re new to reading patterns, choose one you have to pay for as it’s likely to be tech edited and tested. Learning to read patterns on a badly written pattern will be extremely frustrating.
- Check your terms! There are US and UK terms and they’re slightly different. Most patterns will state which terms they’re using. Hint: If there’s a single crochet mention at all, that means the pattern is in US terms as there’s no single crochet in UK terms.
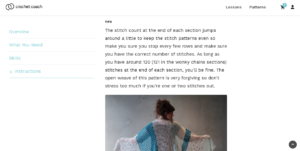
Different Sections of Crochet Patterns
Here are some screen shots of my Nomad Shawl crochet pattern just to show you what each section of a crochet pattern looks like and the information you should should expect to find in each section.
Description
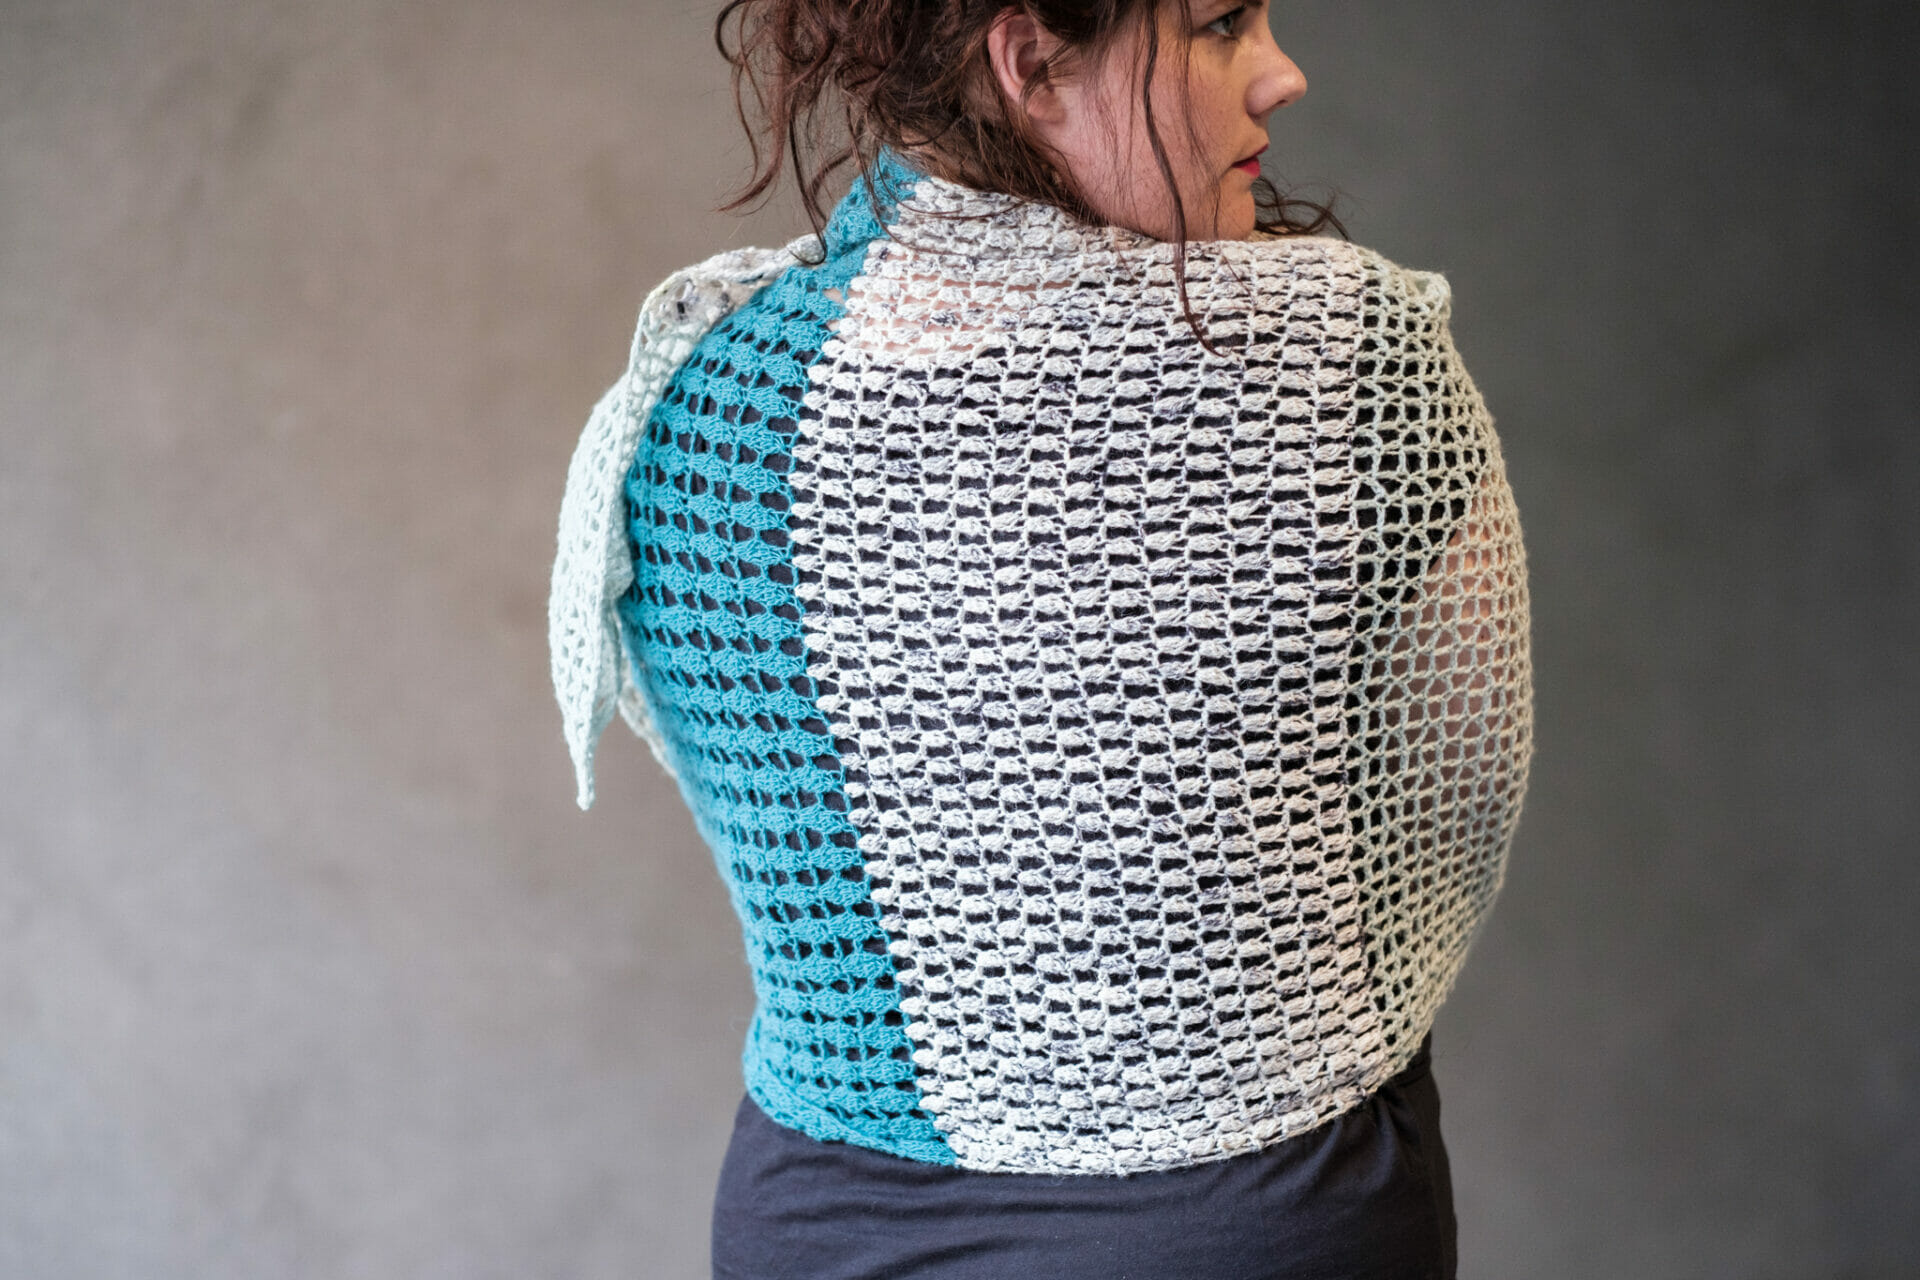
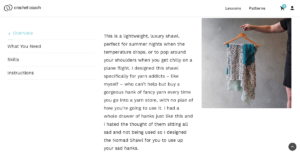
This is where the designer will tell you this pattern makes a lacy, lightweight shawl, a thick winter sweater or a simple pair of slippers. There may be additional information here saying the project is worked in one piece or that there may be several pieces that need stitching together. There will probably also be a photo in this section, unless you’re looking at a vintage pattern in which case the photo for the pattern might be on the cover or a different page of the book.
Finished Size
For an un-sized project just the dimension will be listed. For example a scarf might be 25cm by 150cm.
For garments, there will usually be several sizes listed like this. (I have bolded the medium size as the theoretical size we’re making).
For a cardigan it might say…
Bust : 32, (34, 36) inches
Length : 18, (19, 20) inches
This means there are three sizes, a different size to suit a bust measurement of 32, 34 or 36 inches respectively. The brackets demonstrate where these instructions will be in the pattern. So if you want to make the size that has a 34 inch bust, you always use the stitch count that is positioned first in the bracket (the bolded number).
For the cardigan sizes listed above this is the first row of the pattern.
BACK AND FRONT worked in 1 piece: With No.6 hook ch 130, (138, 146).
So if you were make the 34 inch bust size, you would chain 138 because you’re following the first set of stitch counts inside the brackets. Does that make sense?
For most garments, the next size up simply means a few extra stitches each row so most of the pattern will be the same, you’ll just have to check the brackets at the end of each row of instructions to make sure you’re on task.
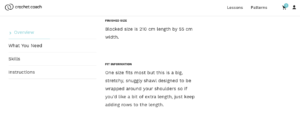
Fit Information
There may be a note here about the properties of the yarn, whether or not the project requires blocking and if the style of the project is fitted or not.
Notes
Here there might be some notes about gauge, hook sizes or tips or tricks that will help with a particular pattern.
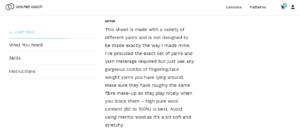
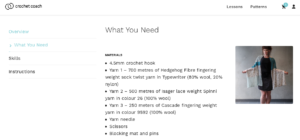
What You Need
Here you’ll find a list of the yarn and materials you need to make the item. Most designers will list the exact brand of yarn they use as well as the fibre make-up of the yarn so you can easily substitute for a different style of yarn.
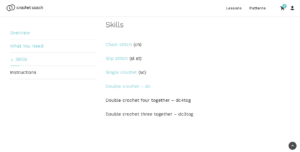
Skills
In most crochet patterns you’ll find a list of skills. This is to make sure you know which stitches you’ll need before you start the pattern. Always check this – the first few rows might be simple single crochets but the middle of the pattern might be a crazy mix of pineapple stitches you don’t have the skills to complete.
In Crochet Coach patterns, I link to videos of me doing the stitches so you’ve got the skills right there. In magazines or vintage patterns, they’ll often have a pictorial guide in the back to show you how to do the stitches you need.
Instructions
This is the fun part where you get to start your project! I recommend reading crochet patterns all the way to the bottom before you get started. Think of reading crochet patterns like a recipe – you need to go through the whole thing to know you have to add the two eggs in the ingredient list separately rather than throw them in at the same time. And believe me, cooking disasters are much easier to fix than crochet disasters so don’t skip this step.
Tips
There are often a few tips at the end of a crochet pattern so make sure you read the whole thing so you don’t miss them! It might be something as simple as attaching a stitch marker to the front of your work after you’ve worked the second row, so you know which side is the right side and if you don’t read the tips first you’ll end up missing important steps like this.
To most beginners, a pattern written in standard crochet abbreviations looks like a foreign language. To help simplify things, I’ve given the first steps of a granny square written first in standard crochet abbreviations, then repeated in standard English. Crochet abbreviations take up a lot less room, which is why they were invented in the first place to save on space and ink when printed in a magazine but the tradition of abbreviations has remained.
Instructions in crochet terminology
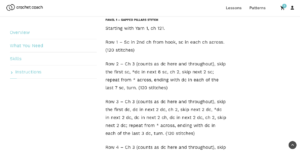
Beginning: Ch 5, sl st in fifth ch from hook.
Round 1: Ch 3, 2 dc, ch 2, 3 dc, ch 2, 3 dc, ch 2, 3 dc, ch 2, sl st to top of ch-3. (12 dc)
Instructions in standard English
Beginning: Chain 5, slip stitch in the fifth chain from the hook to form a loop.
Round 1: Chain 3, (counts as first double crochet), 2 double crochet in the centre of the loop, chain 2. 3 double crochet in centre of loop, chain 2. 3 double crochet in centre of loop, chain 2. 3 double crochet in loop, chain 2. Slip stitch in top of beginning chain 3. (12 double crochet stitches in total this round)
As you can see the standard English instructions take up a lot more room than the abbreviated version.
Here are the abbreviations in one spot – most crochet patterns will provide a little table for you.
ch – Chain
dc – double crochet
sl st – slip stitch
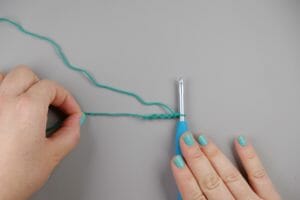
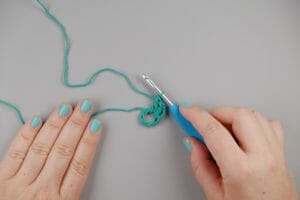
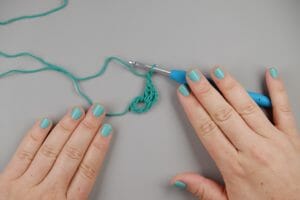
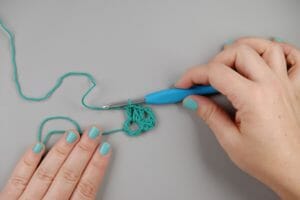
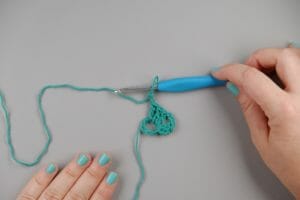
Let’s break it down and look at what the instructions are telling you to do.
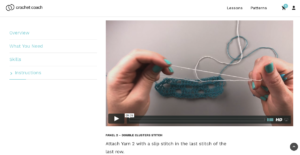
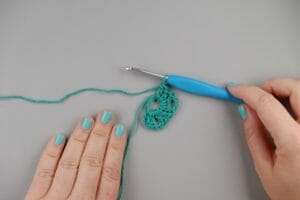
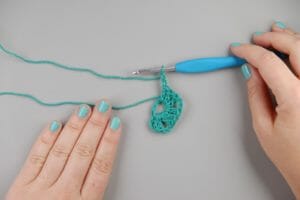
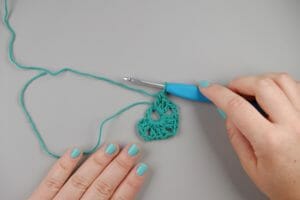
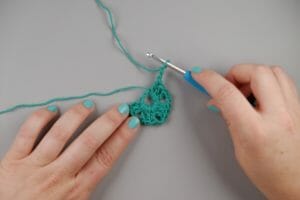
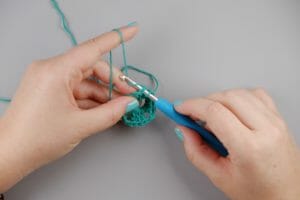
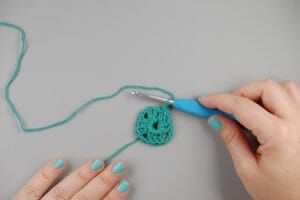
The bolded part is the part I’m working on and the photo underneath the instruction is the completed step. This is the first round of a standard granny square.
Beginning: Ch 5, sl st in fifth ch from hook.
Round 1: Ch 3, 2 dc, ch 2, 3 dc, ch 2, 3 dc, ch 2, 3 dc, ch 2, sl st to top of ch-3. (12 dc)
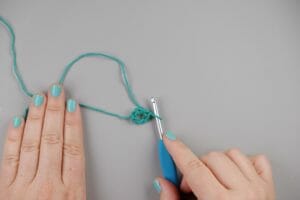
Beginning: Ch 5, sl st in fifth ch from hook.
Round 1: Ch 3, 2 dc, ch 2, 3 dc, ch 2, 3 dc, ch 2, 3 dc, ch 2, sl st to top of ch-3. (12 dc)
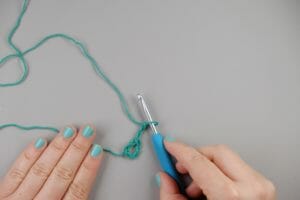
Beginning: Ch 5, sl st in fifth ch from hook.
Round 1: Ch 3, 2 dc, ch 2, 3 dc, ch 2, 3 dc, ch 2, 3 dc, ch 2, sl st to top of ch-3. (12 dc)
Beginning: Ch 5, sl st in fifth ch from hook.
Round 1: Ch 3, 2 dc, ch 2, 3 dc, ch 2, 3 dc, ch 2, 3 dc, ch 2, sl st to top of ch-3. (12 dc)
Beginning: Ch 5, sl st in fifth ch from hook.
Round 1: Ch 3, 2 dc, ch 2, 3 dc, ch 2, 3 dc, ch 2, 3 dc, ch 2, sl st to top of ch-3. (12 dc)
Beginning: Ch 5, sl st in fifth ch from hook.
Round 1: Ch 3, 2 dc, ch 2, 3 dc, ch 2, 3 dc, ch 2, 3 dc, ch 2, sl st to top of ch-3. (12 dc)
Beginning: Ch 5, sl st in fifth ch from hook.
Round 1: Ch 3, 2 dc, ch 2, 3 dc, ch 2, 3 dc, ch 2, 3 dc, ch 2, sl st to top of ch-3. (12 dc)
Beginning: Ch 5, sl st in fifth ch from hook.
Round 1: Ch 3, 2 dc, ch 2, 3 dc, ch 2, 3 dc, ch 2, 3 dc, ch 2, sl st to top of ch-3. (12 dc)
Beginning: Ch 5, sl st in fifth ch from hook.
Round 1: Ch 3, 2 dc, ch 2, 3 dc, ch 2, 3 dc, ch 2, 3 dc, ch 2, sl st to top of ch-3. (12 dc)
Beginning: Ch 5, sl st in fifth ch from hook.
Round 1: Ch 3, 2 dc, ch 2, 3 dc, ch 2, 3 dc, ch 2, 3 dc, ch 2, sl st to top of ch-3. (12 dc)
Beginning: Ch 5, sl st in fifth ch from hook.
Round 1: Ch 3, 2 dc, ch 2, 3 dc, ch 2, 3 dc, ch 2, 3 dc, ch 2, sl st to top of ch-3. (12 dc)
Beginning: Ch 5, sl st in fifth ch from hook.
Round 1: Ch 3, 2 dc, ch 2, 3 dc, ch 2, 3 dc, ch 2, 3 dc, ch 2, sl st to top of ch-3. (12 dc)
Beginning: Ch 5, sl st in fifth ch from hook.
Round 1: Ch 3, 2 dc, ch 2, 3 dc, ch 2, 3 dc, ch 2, 3 dc, ch 2, sl st to top of ch-3. (12 dc)
And that’s how you read a crochet pattern.
If you have any questions at all, just pop them in the comments. If you’re keen to improve your crochet skills in my gorgeous community of Crochettes – you can join here. The group is amazing, there are crocheters of all different skill levels so there’s always someone working at the same pace as you. There’s monthly pattern releases, live web lessons and there’s always someone there in the group to help out. I just love it.
So tell me… how are you at reading patterns? Are you totally ace at it? Or just learning?
8 Comments
-

Really, really helpful thank you. So straight forward and love pictures too!
-
Author
You’re welcome! So glad it helped!
-
-
I need help with a pattern please. I finished my row 1 which ended with 63 sts and 4 ch sps. Row2 says ch3, turn, dc in next st, (dc in each st across to next ch sp, V in ch sp) 4 times, dc in each st across. (127 sts, 4 ch sps).
I have no idea how I go from 63 sts in row 1 to 127 sts in row 2? The V st is a simple little 2dc with a ch1 in the middle. Thanks for any help. Judydegner@gmail.com -
I need help with a pattern please. I finished my row 1 which ended with 63 sts and 4 ch sps. Row2 says ch3, turn, dc in next st, (dc in each st across to next ch sp, V in ch sp) 4 times, dc in each st across. (127 sts, 4 ch sps).
I have no idea how I go from 63 sts in row 1 to 127 sts in row 2-
Author
I’d have to see what it is that you’re making to see if that makes sense. If it’s a shawl and it’s supposed to increase in width, that sounds about right. If it’s not supposed to increase in width, perhaps the next row brings the stitch count back down again to keep it even? The pattern could also be incorrect if it’s a free pattern form non-reputable source it could have mistakes in it. Hope that helps!
-
-
I do t understand ch 3 (counts as dc). 1 sc in first dc (inc made).
-
Finally, it makes sense…your step by step pictures were just what I needed…a visual learner! Can you please explain front post and back post and the lemon peel stitch (sc in dc and dc in sc) in english…thanks!
Pingbacks
-
[…] weights have been standardized by the Craft Yarn Council. However, no two crochet patterns write yarn weight exactly the same, so keep this table convenient while you begin your crochet […]
[…] weights have been standardized by the Craft Yarn Council. However, no two crochet patterns write yarn weight exactly the same, so keep this table convenient while you begin your crochet […]